Beginners Guide
How to remove the timestamp on the GumPack #3 cameras
The New Project
October 28 2010
Great News! As of today it is no longer necessary to make any hardware modifications in order to remove that awful timestamp!
My new project http://www.mytempfiles.info/gum/project3.html is a software only project. No screws need to be removed, nor does the case need to be opened.
I am leaving the Old Project here for reference. It is a last resort in case it is no longer possible to un-brick a bricked camera. It is, however, cheaper to buy one or two new cameras than to buy the equipment needed for this project! But, if you already have the equipment, then please read on...
Newsflash January 2011: A Brand New type of camera, the #11, is now available. The video quality is amazing and is true High Definition Video. Unfortunately it only exists as a keychain (808) model so far, so please pester the seller, who is also the manufacturer and designer of this gem, if you want a H.264 GumPack model. I believe he will produce the GumPack model if there is enough demand for it - so please ask him! The more people ask for the GumPack HD, the more likely it is that they will produce it! The seller supplies firmware to use the camera without the timestamp! Firmware update is an easy process, unlike the #3. The manufacturer also sells a so called "Emergency battery charger" which will let you charge the internal battery AND record at the same time. You can contact the seller directly at hotbid365@gmail.com. The seller is very helpful and has technical knowledge about these cameras. You can also view the HD H.264 camera in the seller's ebay store: http://stores.ebay.com/power-gps. Don't be misslead by cheaper offers from other sellers for fake HD cameras. These are NOT H.264 or HD 720P cameras!
|


The Old Project
One month ago (it's now late July 2010), I barely knew what everybody on Philippe's excellent site were talking about. But I was determined to get rid of that horrible timestamp!
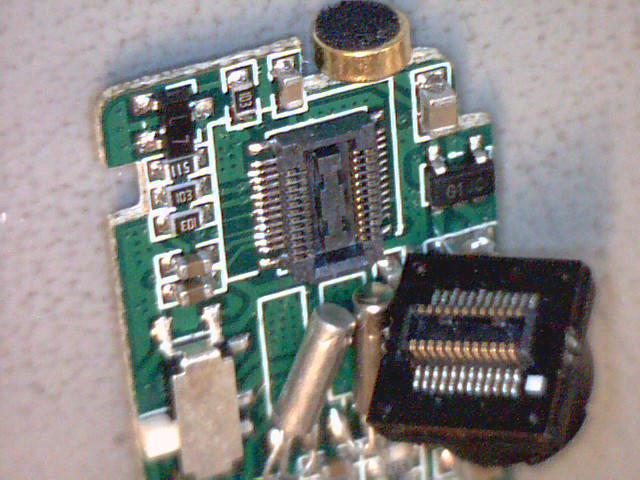
Nobody has yet found a method of removing the timestamp without manipulating the hardware. This project describes a method where it is possible to reprogram the onboard SPI memory chip by desoldering or cutting only 3 legs. It is absolutely not necessary to desolder the whole chip. Note: This method is only possible because HOLD# (pin 7) is shorted on the board to VCC (pin 8). All credit for this method goes to eBay seller "user8012" who also sells the "Nano Programmer" which I use in this project. He is a most helpful person and very professional.
Today I can patch a GumPack in about 15-20 minutes. That is a total, relaxed time, including removing and replacing the 8 screws. I am not an expert and I have never touched SMD before. I believe that this method should work on all variants of the GumPack (808, MD80, Key chain cameras etc.) which incorporate the SunPlus SPCA1527A processor and use an 8-pin SPI memory chip and do not have internal memory for saving data.
The main problem with this project is the tiny size of the chip in question. If you can solder, then this project is definitely for you. If you have never soldered before, then I suggest that you don't attempt this project. The problem area is not the soldering, but rather the desoldering. However, it's possible to avoid the desoldering part by simply cutting the three legs on the memory chip instead of desoldering them. Of course, if you do this, you will have to solder the legs together again when finished.
If you can find 6 grabbers then you can do a very professional job indeed, with no trace of manipulation except maybe 3 better soldered joints. If you don't have the grabbers you will have to solder the wires onto the 6 legs.
I made my own harness for the grabbers and I wrote a simple patcher program which replaces the font in the extracted file with a transparent font. I have taken all the information from Philippe's site. The patcher program can be downloaded and used freely by anyone interested. It can be downloaded here.
In another project, I show how it is a fairly simple task to use an external USB battery pack or power supply so that it's possible to record about 7 hours of continuous video. Click here to see this project.
Tools Needed
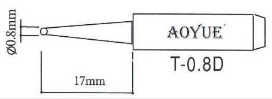
- To start with, I did not have an SMD soldering iron, so I had to buy one.
I bought an AOYUE 936 Soldering Iron complete with a soldering tip of 0.8
mm diameter (which is the perfect size for this project) on eBay for 29
Euro. I also needed some very thin low melting point solder, 0.25mm is
ideal. I bought mine on eBay.
- I also needed a programmer. I am not a guru like Philippe, so I needed
something simple. I found the "Nano Programmer" on eBay for $20 including
postage worldwide. You will also need a programming harness. See the
diagram in "Programming the memory" below.
- Since the GumPack is so tiny, you'll most probably also need a magnifying glass fixed to the table (5 dioptres is perfect, 3 dioptres is also ok).
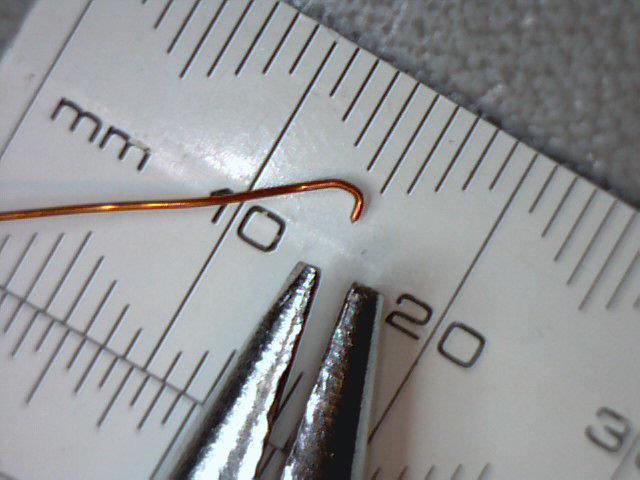
- I don't know if a special tool exists, but I use a piece of varnished copper wire (like the wire used in transformers) to break the solder joint between the chip leg and the solder pad. This method works really well, but the diameter of the wire is important. Because the wire is varnished, it shouldn't adhere to the solder. I use 0.376 mm (28 SWG) which is perfect, but it can't be any thicker or you won't be able to thread it between the legs. I don't recommend using a diameter less than 0.315 mm (30 SWG)
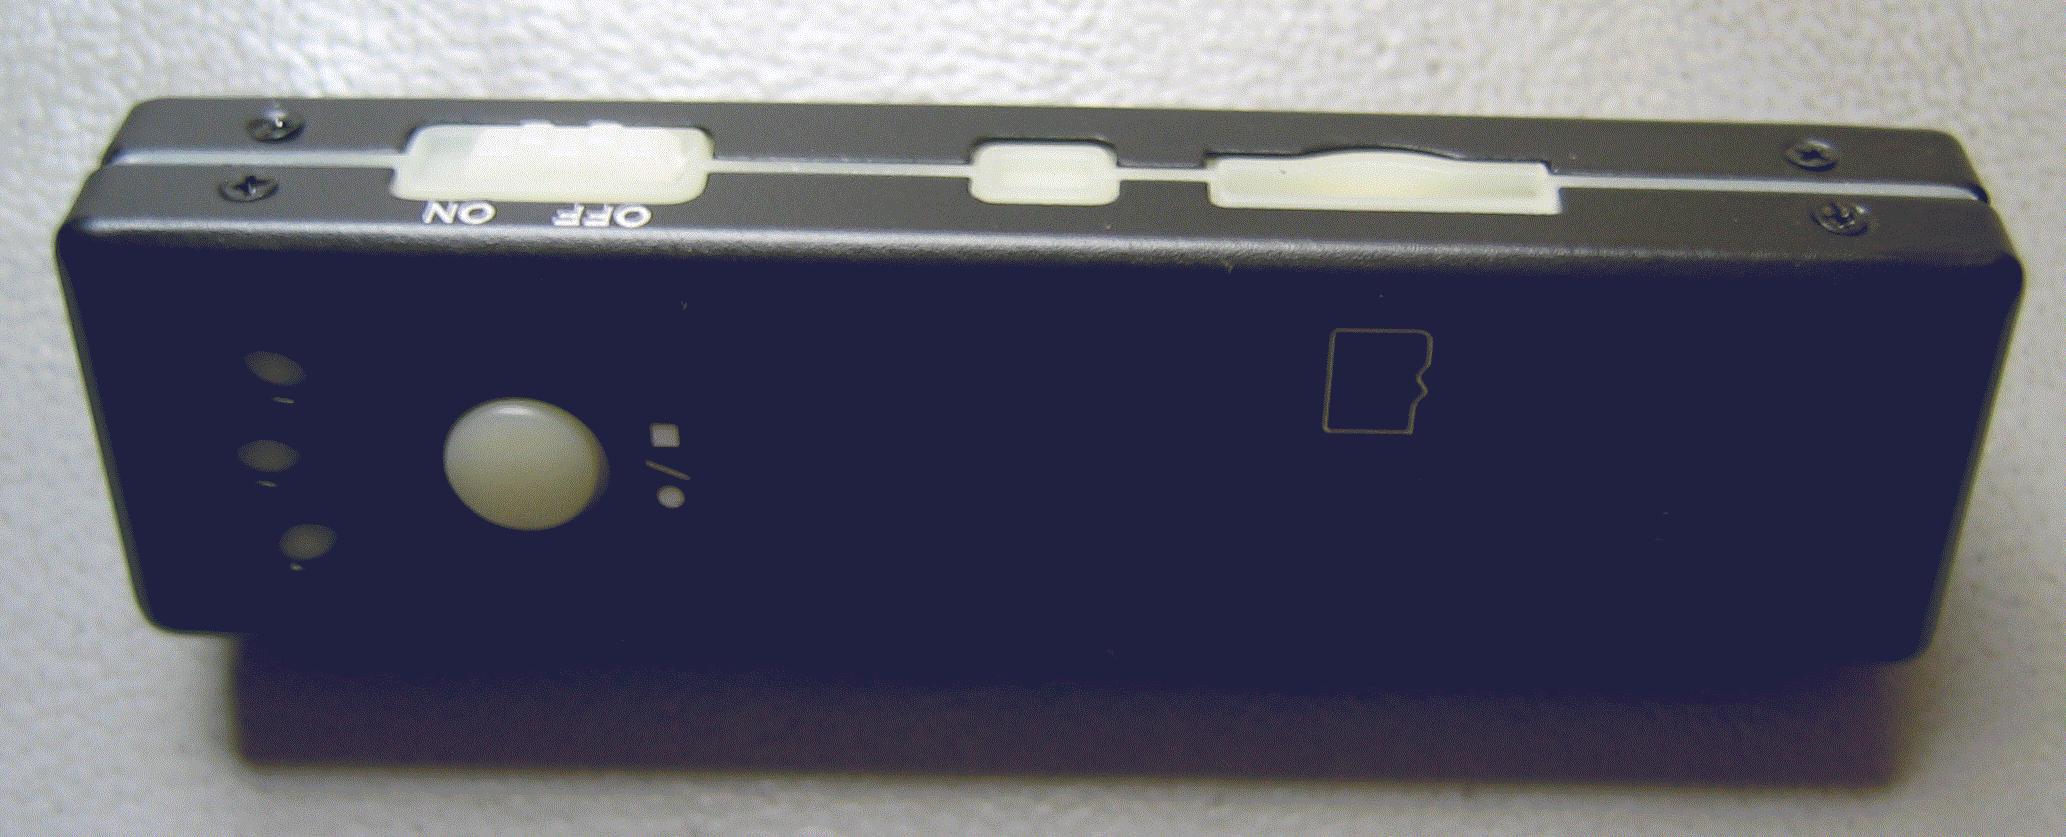
- Also needed is a small cross-head screwdriver for the 8 screws, a small watchmaker's flat-bladed screwdriver to bend the unsoldered leg up from the board, a needle-nosed pliers to bend and pull the copper wire and liquid Tipp-Ex or fast drying white paint to mark the position of the lens in case it falls off. Some lenses are already marked on the underside, so if this is the case you do not need the liquid Tipp-Ex (see the photo below).

Preparing the GumPack
- Turn the GumPack OFF. This is important to avoid damage.
- Remove the 8 cross-head screws and put them in a safe place.
- Remove the back and front covers of the GumPack, they should come off easily, DO NOT use brute force.
- Mark the top left corner of the lens body with a tiny spot of Tipp-Ex.
Don't mark the lens itself! The lens is in a socket and it can easily fall
out. The spot allows the lens to be correctly positioned in case this
happens. Some Lenses have a white spot on the left top underside. In this
case it is not necessary to mark the lens (see the picture below).
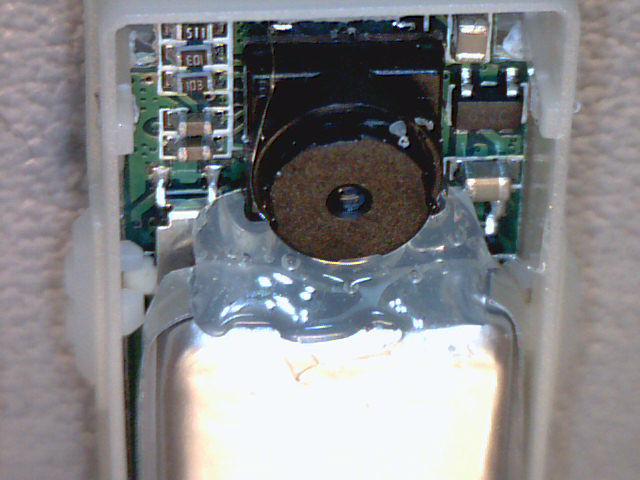
- The battery may be attached by hot-glue or sticky foam. Carefully free
the battery (don't disconnect it yet) and VERY CAREFULLY clean up
any mess left behind. Be careful not to break or scrape any components or
the board.
- Carefully remove the mainboard, which can be quite tricky. Start at the sides and top. Pull the sides slightly apart to disengage the switches (these can easily be broken) and ensure that they are free before easing out the top. Don't let the battery hang on it's wires, or they may break. The board must be removed from the top first because the USB socket is held tightly in place by the plastic. Remove the board at an angle of about 30 degrees, pulling gently at the top. Make sure that the two plastic sliders do not separate from the main plastic surround - they too can break easily.
- Turn on the soldering iron and set the temperature to about 375°C (700°F).
- Write down, or take a picture, of the battery connectors. On some boards
the red connector pad is marked with a +.
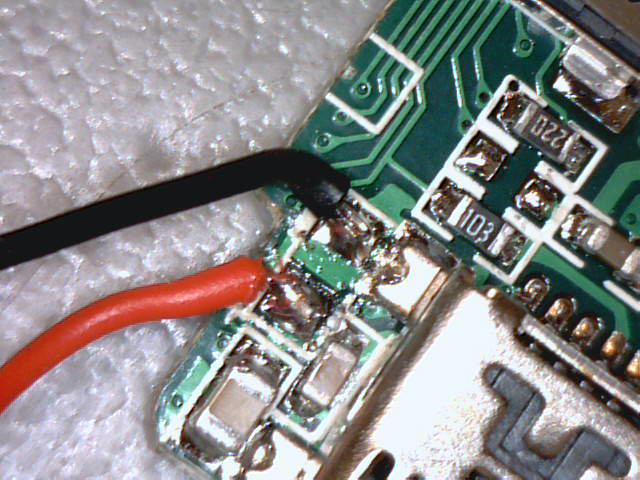
- Desolder the two battery connectors, making sure not to short circuit the battery in the process.
Now things become a little tricky
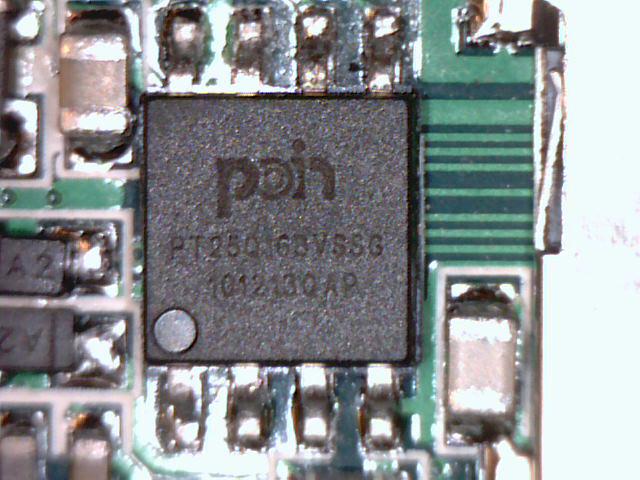
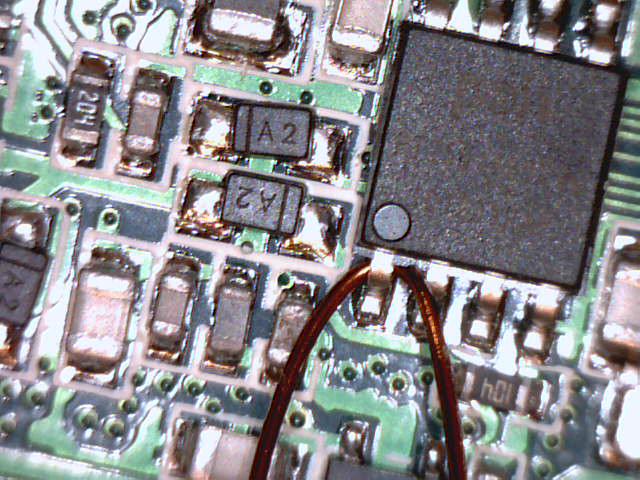
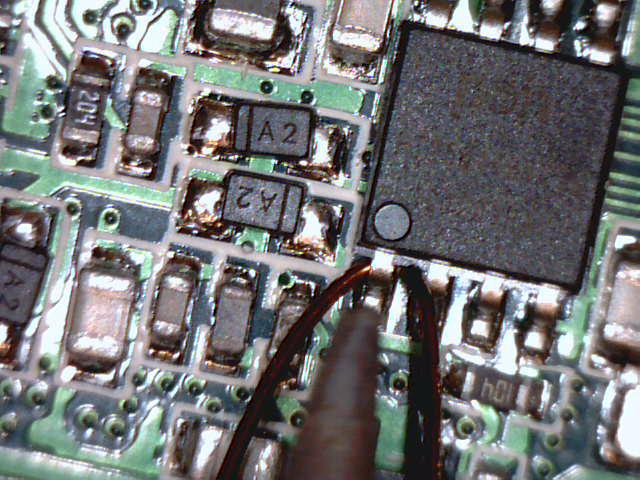
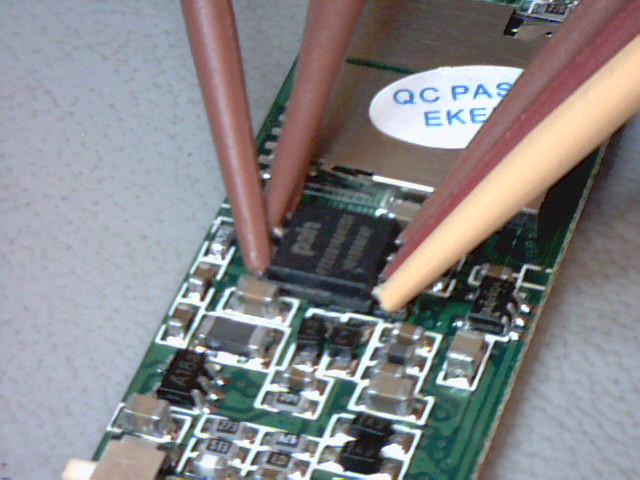
A small dot on the top of the memory chip designates Pin 1.

There are three pins (1, 5 and 6) which have to be desoldered or cut. Cutting the legs is the easy method. If you decide to cut the legs, ignore the following instructions and go to the Programming section below. Using the pliers, bend a very small "U" at the end of a piece of varnished copper wire. Loop this wire around the back of pin 1 and carefully pull out the threaded end about 3 cm (1 inch). This is quite fiddly, and it may take a bit of time to ease the wire so that it fits around the bottom of the leg. You should use the thickest wire possible.
Once the wire is looped around the leg, hold the long end and apply the soldering iron to the bottom of the leg. As soon as the solder starts to melt, remove the iron and gently pull on the wire loop. It should break the solder joint between leg and pad. These two operations must be done simultaneously. If all is well, the leg will be separated from the pad on the board. The spacing between leg and pad should be barely visible. Check under the magnifying glass. If it failed, then try again a second time, but be patient. Don't apply heat too long because excessive heat will "lift" the pad from the board.
Once separated, carefully bend the leg upwards so there is at least a 1 mm gap between leg and pad. The legs are very fragile, you can't bend them more than once or twice or they will break off - I have warned you.
Repeat this procedure on the remaining two legs.
Programming the memory
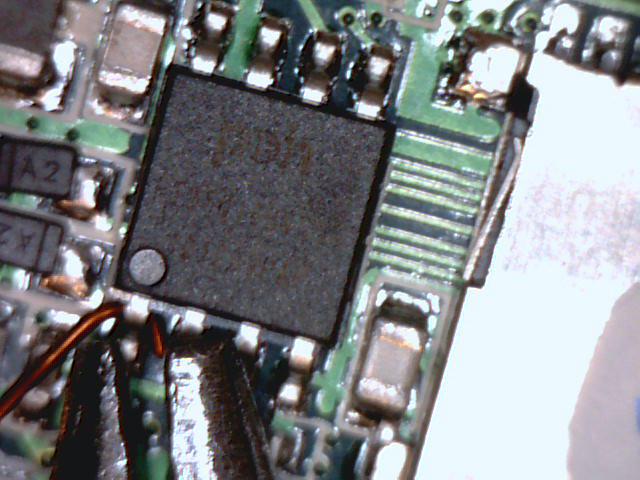
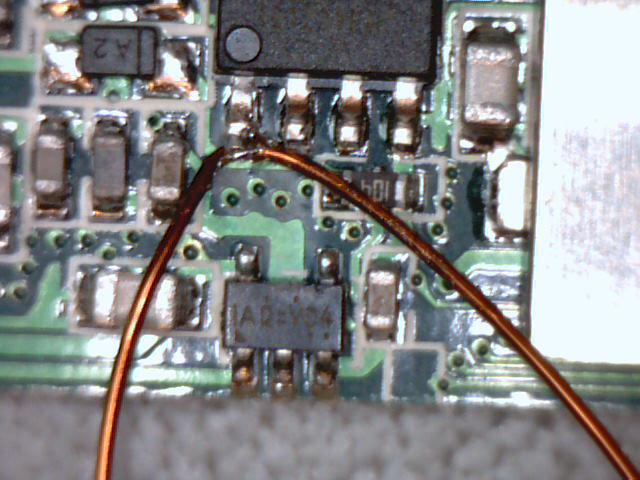
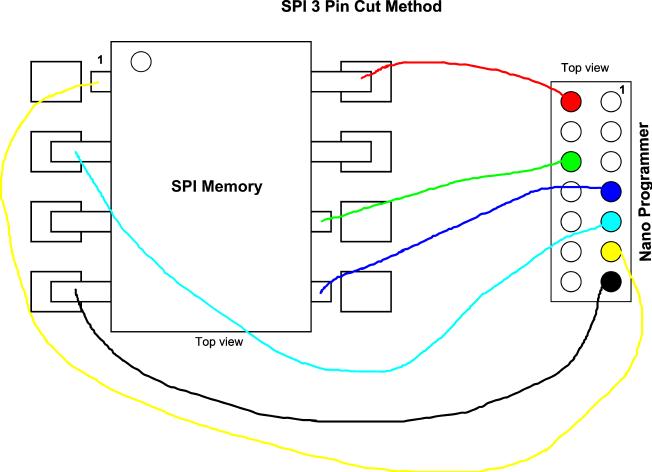
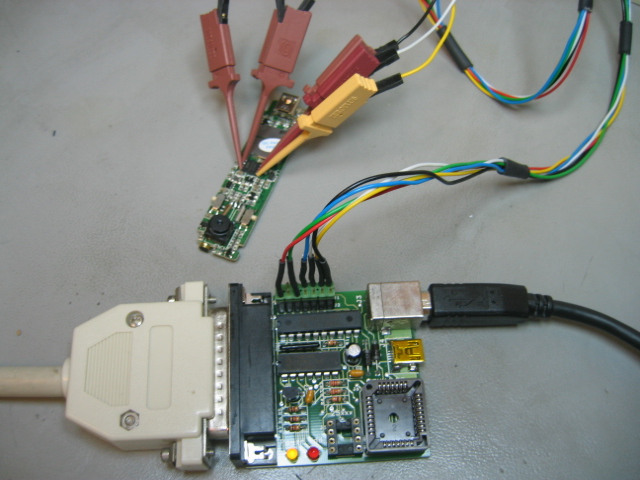
I made my own harness using grabbers. If you don't have any grabbers you will have to use very thin wires and solder them directly to the legs of the chip. Refer to my diagram. I am sure that eBay seller "user8012" will make the harness for you if you send him the diagram below. I doubt that he sells the grabbers. They are difficult to find and are expensive. I was lucky to get mine for free.

- Connect (or solder) the six wires from the harness to the correct legs of
the memory chip. Connect one end of the harness to the "Nano Programmer"
observing the correct orientation (Pin 1 is marked on the Programmer
board).
- Double and triple check the connections. Check the diagram above - it is 100% correct.
- Connect the "Nano Programmer" to the parallel printer port. You can use an extension cable (all 25 pins must be connected) if desired. I use a 3.5 meter cable and it works perfectly. Note that the "Nano Programmer" requires a REAL parallel port. A USB-to-Parallel converter will not work.
- Connect a USB cable between the "Nano Programmer" and the PC. The USB cable is only used as the power supply for the programmer.
- Run the program biosw.exe (the link was sent to you when you purchased the "Nano Programmer"). Most probably your antivirus program will block it's operation. You will have to disable your antivirus or add the …\documents and settings\… path to the exceptions. It took me quite some time to figure out how I could do this with my AVG antivirus program.
- When the program starts, press the "Read" button and enter the path and name of the file you wish to create. The programmer should recognize the memory chip automatically. It may, however, ask you to select the device type (SPI -> EON -> EN25F16 worked for me). I have noticed that different types of SPI memory are used in different cameras. On one camera, I couldn't read the SPI chip and ended up replacing the chip ($8 down the drain). I don't know if this was a problem with the chip or the programmer or that I messed something up. Replacing the chip was very difficult for me, as a beginner in SMD. I hope you don't have to do this!
- The programmer will display the progress in percentage. After 1 to 2 minutes, you should have a 2MB binary file in the folder you specified.
- Minimize the program and run my freeware program NoTimeStamp.exe.
- Enter (or browse for) the source file name. This is the name you entered above. The program will automatically use this file as the destination file, but will add the ending ".new". You can change this if you wish, but I recommend that you keep the name as it is. Now press the "Patch!" button. The status window will tell you if everything went well or not. If the data was successfully patched, you can close NoTimeStamp.exe.
- Switch back to biosw.exe and click the "Write" button. When asked, select the patched file (the one with the .new ending - unless you changed it). Don't forget to select "All file types *". You may also be asked for the device type (see above). After about 3 or 4 minutes, the program should display "success" on the status bar on the bottom left corner. You can close the program.
- Remove the USB connection from the PC and disconnect the "Nano Programmer" from the parallel port. Remove the harness from the programmer, remove the USB lead from the programmer.
- Disconnect, or desolder the 6 wires from the SPI memory chip.
- Bend the 3 disconnected legs down, using a watchmaker's flat-bladed screwdriver, so they make contact with the solder pads. If you cut the wires, you will have to solder them together, but don't apply heat for too long or the cut part will separate itself from the pad.
- Resolder the legs onto the pads. Although most probably not necessary, I always apply about 1 mm of fresh solder. Check the joints using the magnifying glass,
- Resolder the battery, being very careful not to invert the negative and positive wires.
- Reassemble the GumPack, inserting the bottom part of the board first, and pay special attention to the two side switches. Slightly pull apart the long edges of the plastic "cage" while easing the board into place. Replace the back and front covers and replace the 8 screws. Don't overtighten the screws or you will damage the plastic thread.
- Make sure that the SD card is inserted, then test the GumPack.
Findings
I bought 3 of these gumpacks from the same seller at the same time. Every one had a different firmware. No. 2 shows a lot of differences and it only supported max. 16GB SD cards. I replaced all the firmware with the patched firmware from No. 1. This firmware supports 32GB SD cards and so far has worked very well. For those interested, I am including the three UNPATCHED (with timestamp) firmware versions. Download NoTimeStamp.exe to remove the timestamp from the files.
Credits
All credit goes to the gurus who really found out how to get rid of the timestamp and program the chip. What they have discovered is amazing. I have learnt a lot from them and have used their ideas and methods to make this project. I hope others will also appreciate their work.
To name a few:
Philippe, Chuck, Bill W., Spinner, David Sykes, user8012 and others
Useful sites
This project is based on information taken from these excellent sites.
http://www.pluc.fr/2010/02/tear-down-and-hacking-around-gumpack-camera/
I have written another article here, if you wish to record while the camera is connected to an external USB battery pack.
Thank you for reading.
Isoprop
Last updated: 5th November 2010